Hello, this is the SmallBuilder team.
When creating a quote, simply selecting products is not enough. In situations where multiple sales conditions and pricing factors must be considered together, it’s essential to review various related data.
In this post, we will introduce how to use SmallBuilder Line Items to quickly and easily search related data using data sources when selecting products in a quote.
Business Use Case

In a corporate environment, it is very important to instantly verify various pricing information and inventory status when selecting a product. For example:
- Consumer Price: The price offered to the end consumer.
- Dealer Price: The discounted price applied to dealers.
- Distributor Price: The price provided to distributors.
- Inventory Status: The current availability and quantity of the product.
We will implement a feature to search this data in real time through SmallBuilder Line Items when adding products.
Step 1: Object Connection
To set up the data that can be searched when selecting products in the quote, we first configure the parent object, line item object, and the lookup object.
In this use case, since data search is necessary from the quote, we have set it up as follows:
- Parent Object : Quote
- Line Item Object : Quote Line Item
- Parent Reference Field : Quote ID
- Lookup Object : Price Book Entry ID
To expose the price book and currency similar to the quote from the price book entry, we also add a filter through the query.
Pricebook2Id = '{$Parent.Pricebook2Id}' AND CurrencyIsoCode = '{$Parent.CurrencyIsoCode}'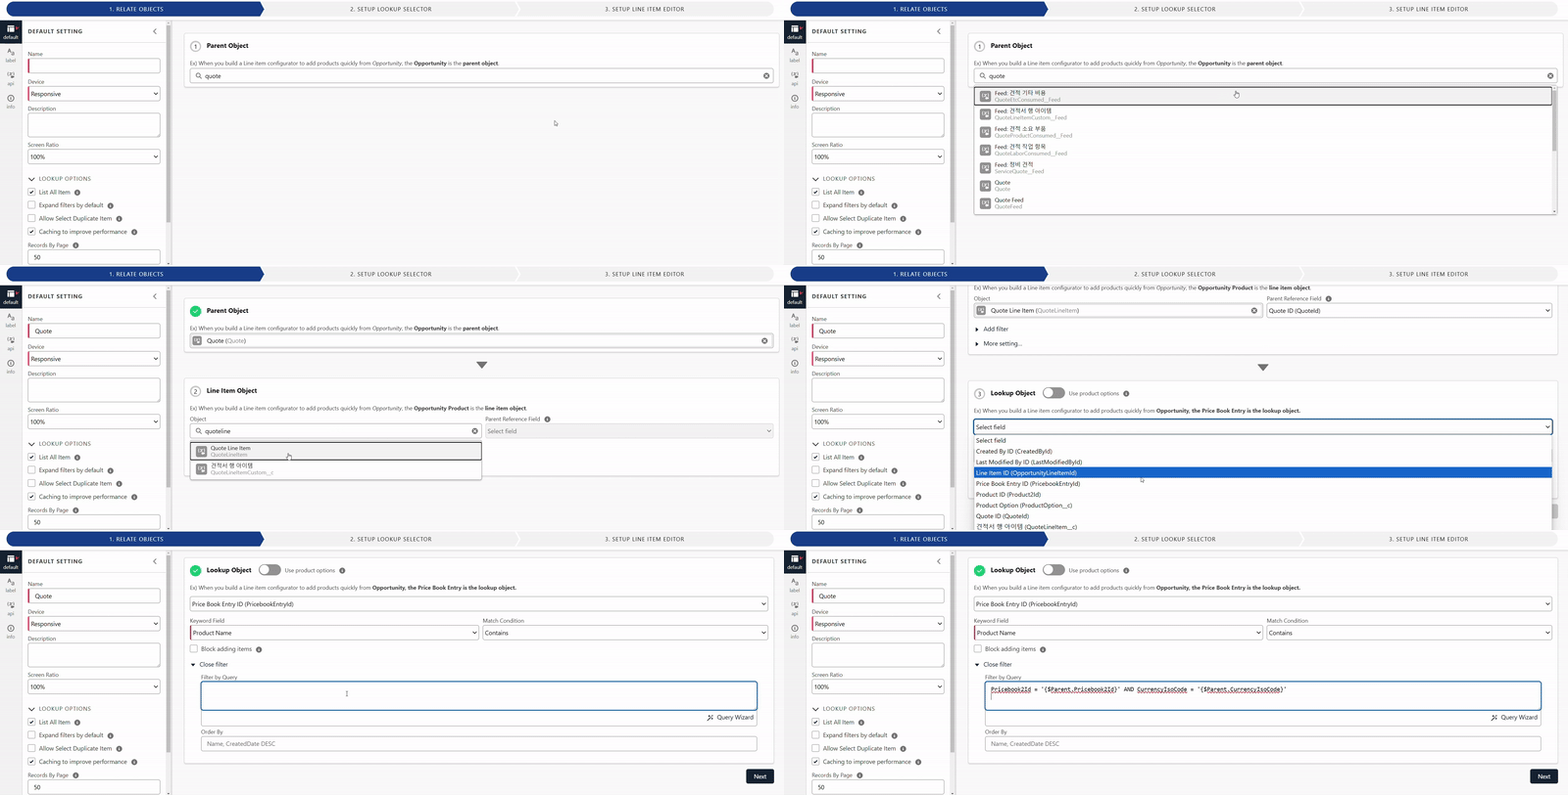
You can also configure as follows using the query wizard.

Step 2: Configure the Lookup Selector
Add the fields that will be displayed when searching for products and the related data to be searched.
Connecting the data source can be somewhat complex, so let’s break down the steps and examine them one by one.
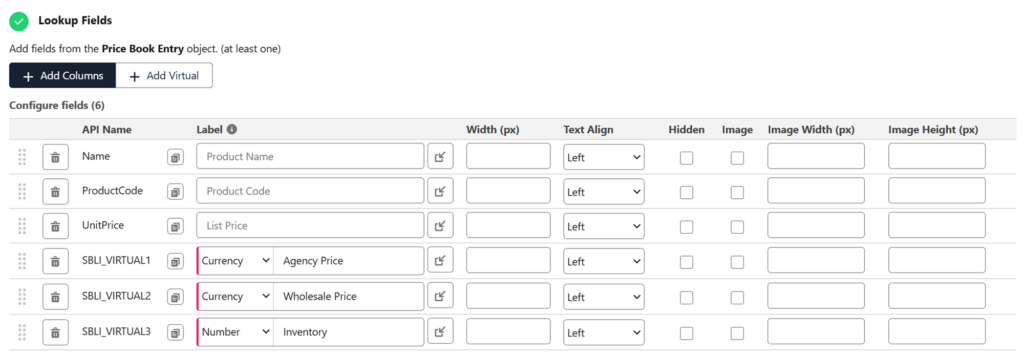
1 Add Columns and Virtual Columns
After adding the product’s basic information, such as product name, product code, and list price, click the “Add Virtual Column” button and change the labels to what will actually be displayed.
(e.g., label SBLI_VIRTUAL1, 2, 3 sequentially as Dealer Price, Distributor Price, and Inventory.)
2 Add Data Source
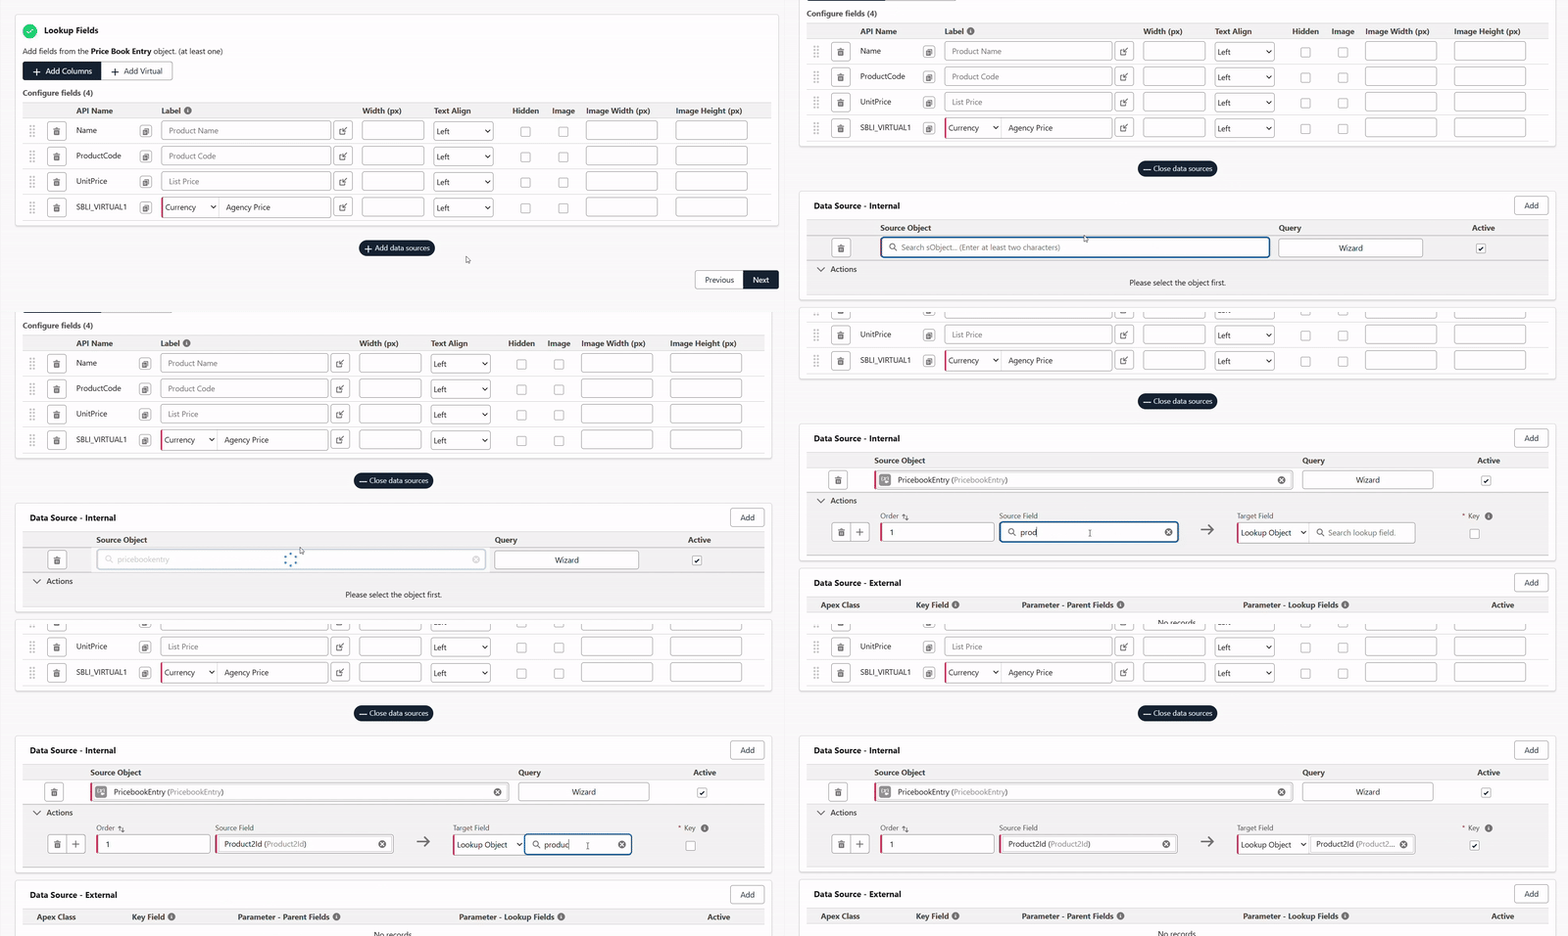
Click the Add Data Source button, then click the Add button, and first select the source object.
Since the dealer price and distributor price need to display the list price (Unit Price) from the price book entry, configure it as follows:
- Source Object: PricebookEntry
After selecting the source object, set the Key to properly link the data.
Specify the Key field (e.g., Product ID) that is used in both the source object (e.g., Pricebook Entry) and the lookup object (e.g., Pricebook Entry).
(*Note: The Key checkbox must be activated.)
3 Set Dealer Price
Link the list price (Unit Price) from the price book entry to the previously created virtual column 1 (SBLI_VIRTUAL1).
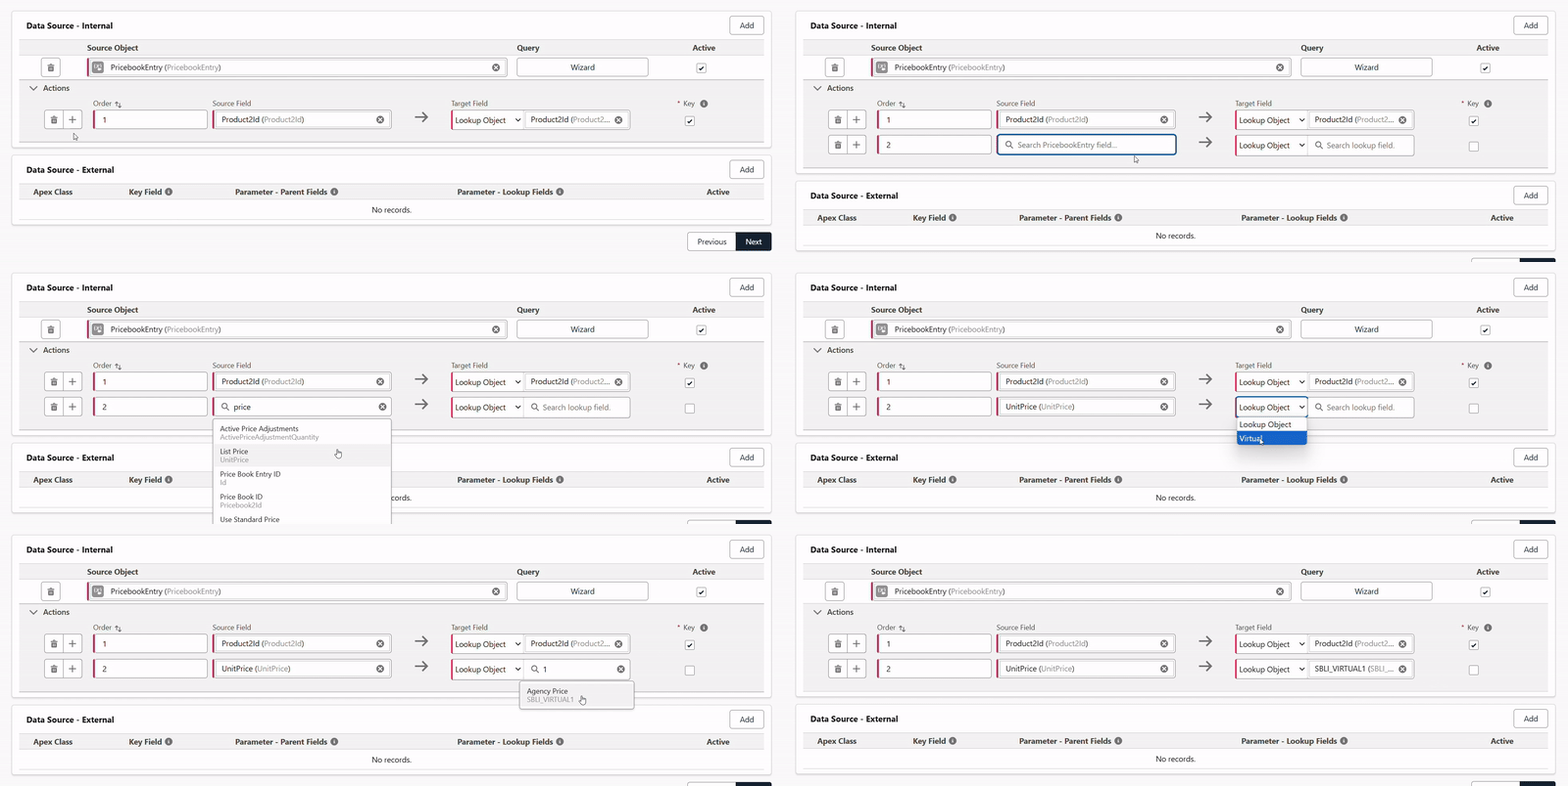
To display only the price book associated with the dealer price, use the query wizard to filter for the desired price book.
To make it easier to find the price book, first create a formula field in the price book entry with the following formula.
Pricebook2.Name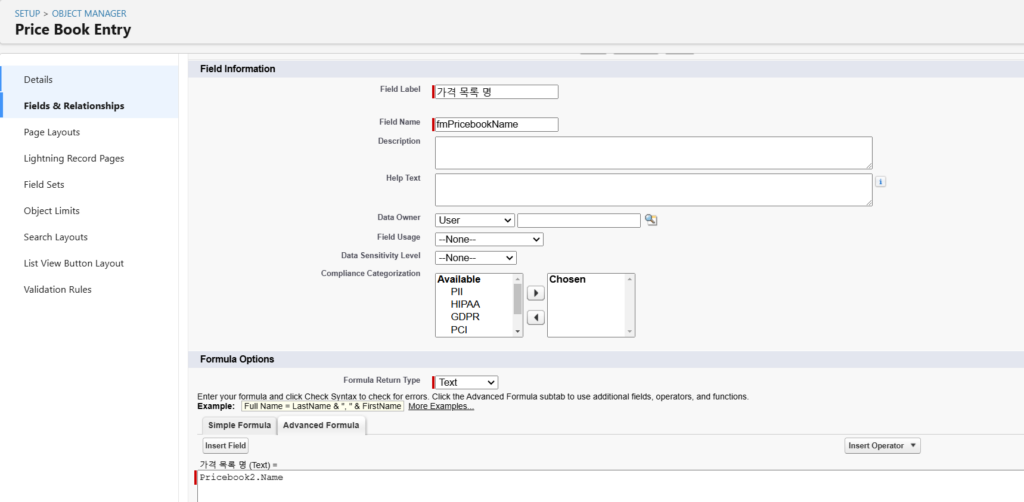
Enter the following query to display entries that have the same currency as the quote and a price book name of “Equipment – Dealer.”
CurrencyIsoCode = {$Parent.CurrencyIsoCode} AND fmPricebookName__c = 'Equipment - Dealer'
4 Set Distributor Price
Set up the distributor price in the same way as the dealer price.
Link the key field in the same manner as the dealer price (Product2Id → Product2Id), and connect Virtual Column 2 (SBLI_VIRTUAL2) with the Unit Price.
Complete the setup by entering a query to display only the price book that includes the distributor price (e.g., Equipment – Distributor).
CurrencyIsoCode = {$Parent.CurrencyIsoCode} AND fmPricebookName__c = 'Equipment - Distributor'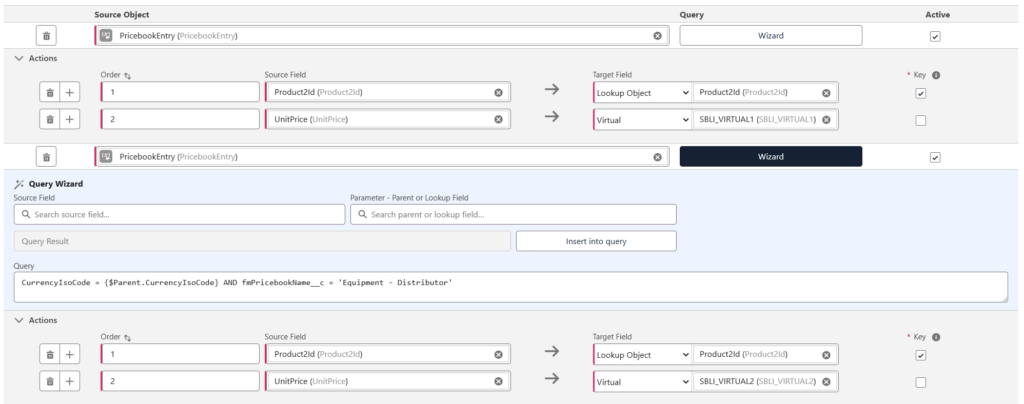
5 Set Inventory
To link the inventory management object, add another data source and search for Inventory.
As with the dealer and distributor prices, set the product ID as the key field, then link it to Virtual Column 3 (SBLI_VIRTUAL3).
In this use case, the inventory is configured to display based on the same warehouse as the quote.
Warehouse__c = {$Parent.fmWarehouse__c}
Step 3 : Set Line Item Editor
Click the Add Column button to add line item fields, and change labels as needed.
If the source field is not from the parent object, adjust the source field to match each line item field accordingly.
In this use case, since dealer price, distributor price, and inventory are all retrieved from virtual columns, select the virtual columns and choose the appropriate fields for each.

Conclusion
By utilizing SmallBuilder Line Items, you can easily view various pricing information and inventory status when selecting products in a quote. This allows the sales team to make quicker decisions based on accurate information, offer appropriate pricing to customers, and check inventory status in real time.
In this post, we walked through the process of implementing the related data search feature step-by-step. This feature helps companies improve data management and pricing processes efficiently.
Discover even more possibilities with SmallBuilder and take your business competitiveness to the next level.
Thank you.


![[Use Case] View Prices and Inventory at a Glance! Data Search Related to Line Items](https://blog.smallbuilder.com/wp-content/uploads/2024/10/Use-Case-가격과-재고를-한눈에-Line-Items-관련-데이터-조회-1.jpg)
![[Use Case] Easily Managing Detail Data in Master-Detail Relationship [Use Case] Master-Detail에서 Detail 데이터 쉽게 관리하기](https://blog.smallbuilder.com/wp-content/uploads/2025/02/Use-Case-Master-Detail에서-Detail-데이터-쉽게-관리하기-370x245.jpg)
![[Use Case] Process Mass Action and Row Action on List Directly [Use Case] 리스트에서 바로 처리하는 Mass Action과 Row Action](https://blog.smallbuilder.com/wp-content/uploads/2024/11/Use-Case-리스트에서-바로-처리하는-Mass-Action과-Row-Action-370x245.jpg)
![[Use Case] Import & Export : An Essential Tool for Managing Bulk Data [Use Case] Excel Import & Export 대량 데이터 관리의 필수 도구](https://blog.smallbuilder.com/wp-content/uploads/2024/10/Use-Case-Excel-Import-Export-대량-데이터-관리의-필수-도구-370x245.jpg)
