Hello, this is the SmallBuilder team.
Salesforce enables efficient management of various price through Price book.
However, when dynamic conditions such as discounts are required, standard features alone may be limited, as not all products share the same pricing.
For companies handling large product catalogs or complex pricing structures, the ability to dynamically apply and calculate discounts for each individual product becomes essential.
For instance, if different discount rates need to be applied per product, you can use SmallBuilder Line Items to dynamically calculate and manage pricing based on each product’s specific discount rates.
In this post, we’ll explore how to use SmallBuilder Line Items to easily calculate and apply discounts according to various discount criteria.
Business Use Case
In business, it’s often necessary to apply different discount rates on various products.
In these situations, the feature to manually enter a discount rate for each product when adding it, and then have the price automatically calculated and the total price instantly updated based on entered discount rate, becomes essential.
Using SmallBuilder Line Items, you can implement following features:
- Entering Discount rate per product: Manually enter a discount rate for each Line item
- Automatically price calculation: Product prices are automatically calculated and updated in real-time based on the entered discount rates
Now, let’s implement a dynamic calculation feature to apply discounts when adding products.
Step 1 : Set up Parent and Line Item Objects
Select the parent object (e.g., Opportunity) and the line item object (e.g., Opportunity Product) that will serve as the basis for using the SmallBuilder Line Item Editor.
Then, choose the field in the line item object that references the parent object (e.g., Opportunity ID).

Step 2 : Set Lookup Object and Filters
Since the lookup object needs to search prices by product, select the Pricebook Entry ID.

For the keyword search field, choose which field to use as the basis for product searches. You can select between two match conditions: “Contains” (includes the search term) or “Starts with” (begins with the search term), allowing flexible application based on product categorization.
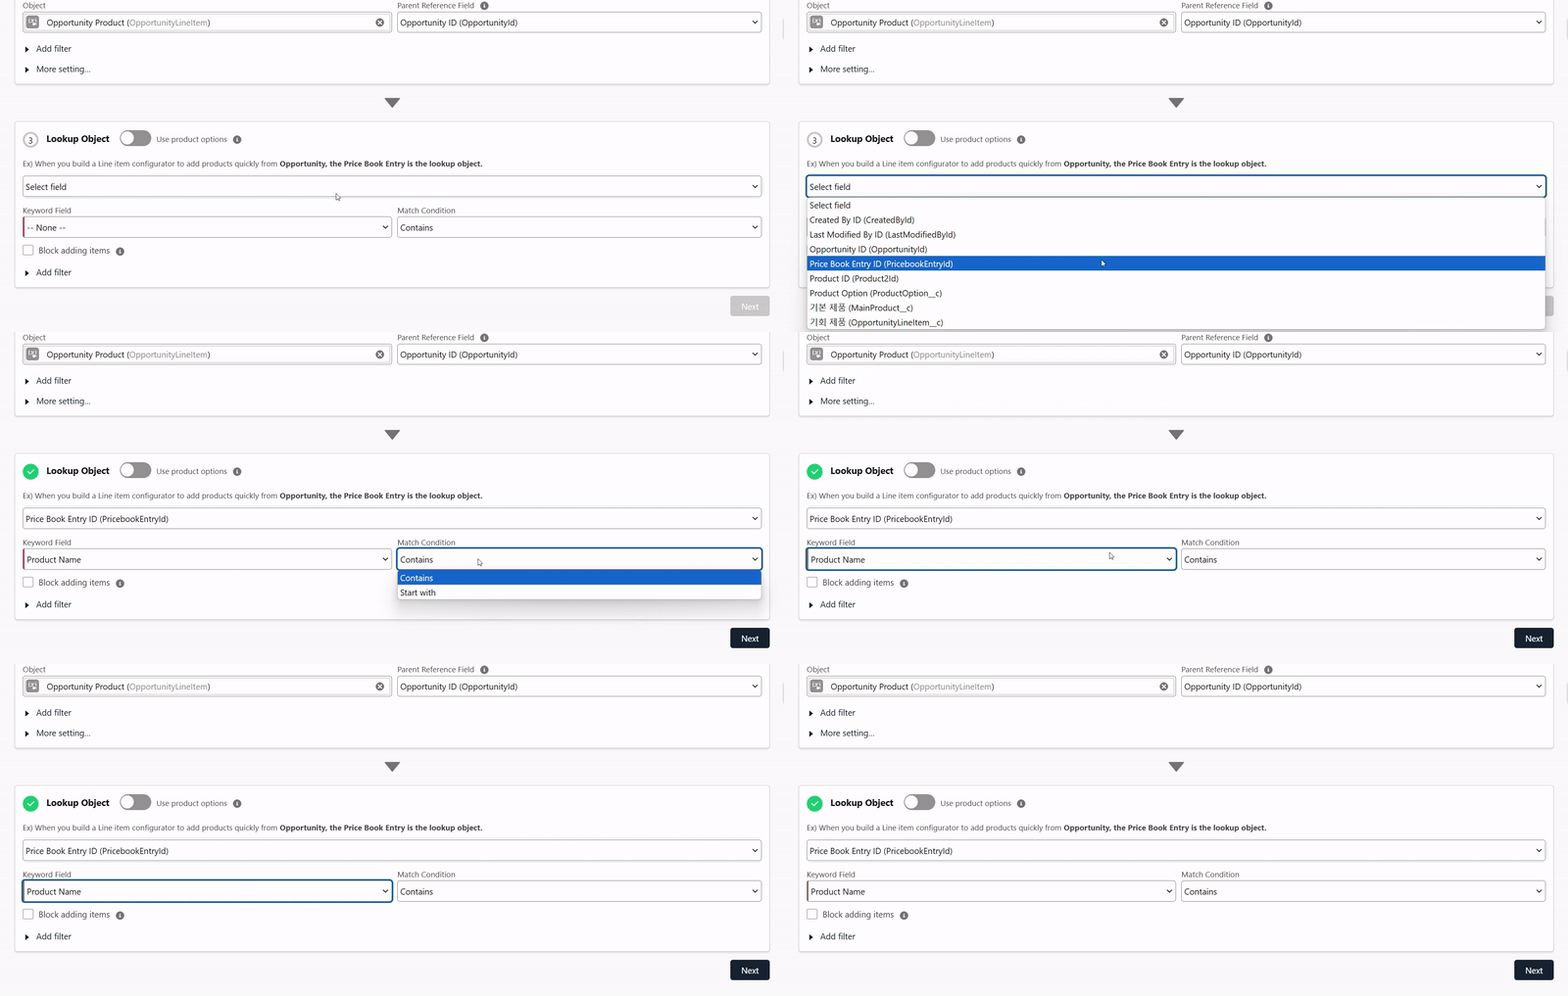
Additionally, you can add filters to display only the desired records. To search records that match the Pricebook and currency ISO code of the parent object, added a query like the one shown below.
Pricebook2Id = '{$Parent.Pricebook2Id}'
AND CurrencyIsoCode = '{$Parent.CurrencyIsoCode}'
If you’re not familiar with queries, you can use the Query Wizard feature to quickly and easily add conditions to filter the necessary records. Both labels and APIs are available for searching.

Step 3 : Configure Lookup Selector
Once the object connections has completed, click Next to proceed to the Lookup selector step.
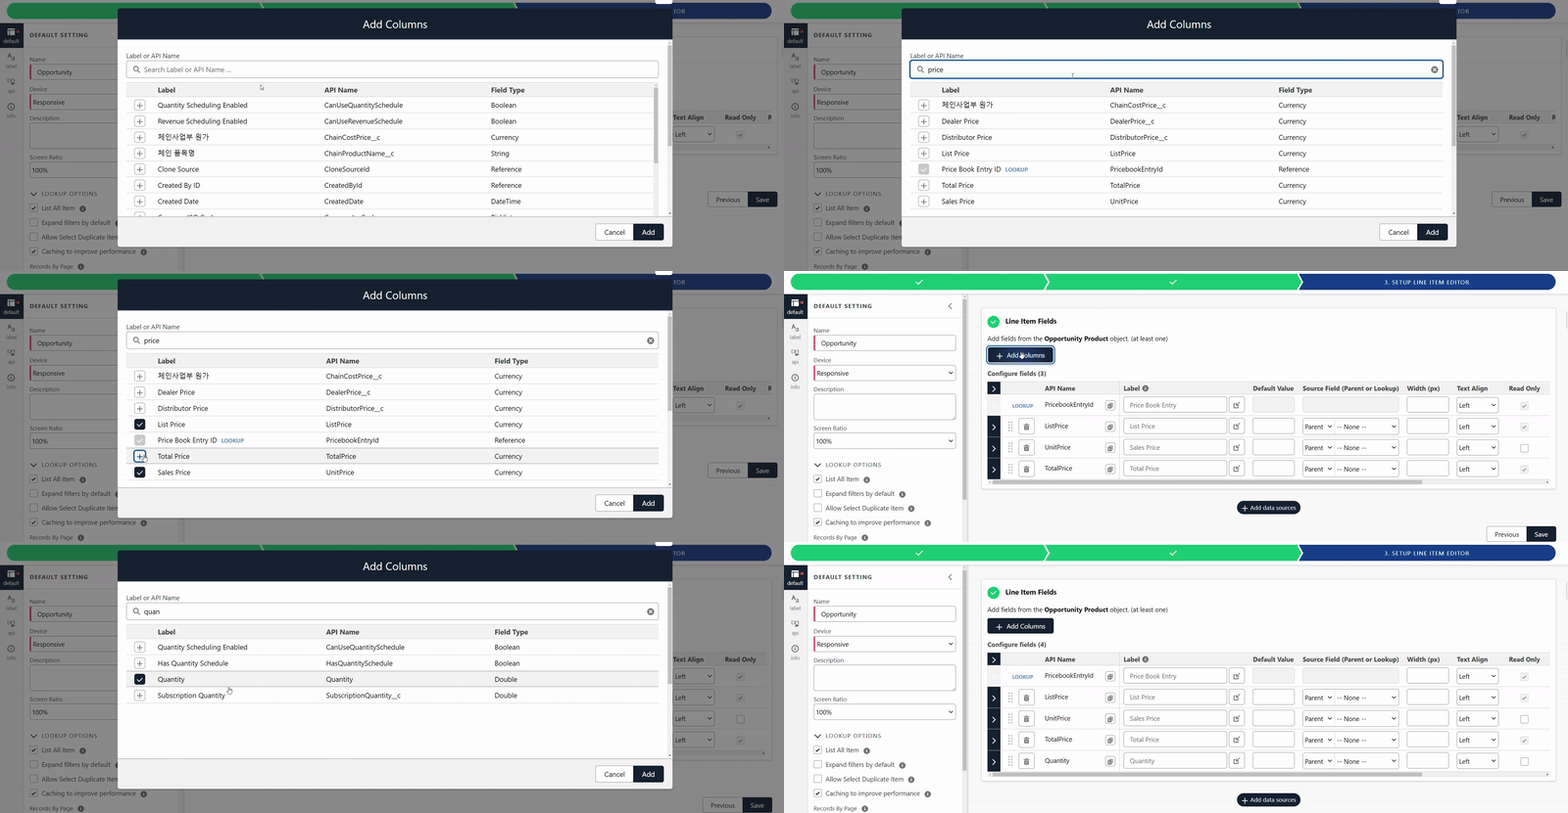
This step involves setting the display fields for the lookup object, allowing you to specify which fields appear when searching for products.

Click the “Add Column” button to include the fields you want to display. You can also easily adjust labels, column widths, and more, allowing for quick and convenient customization of the list layout.
Step 4 : Configure Line Item Editor
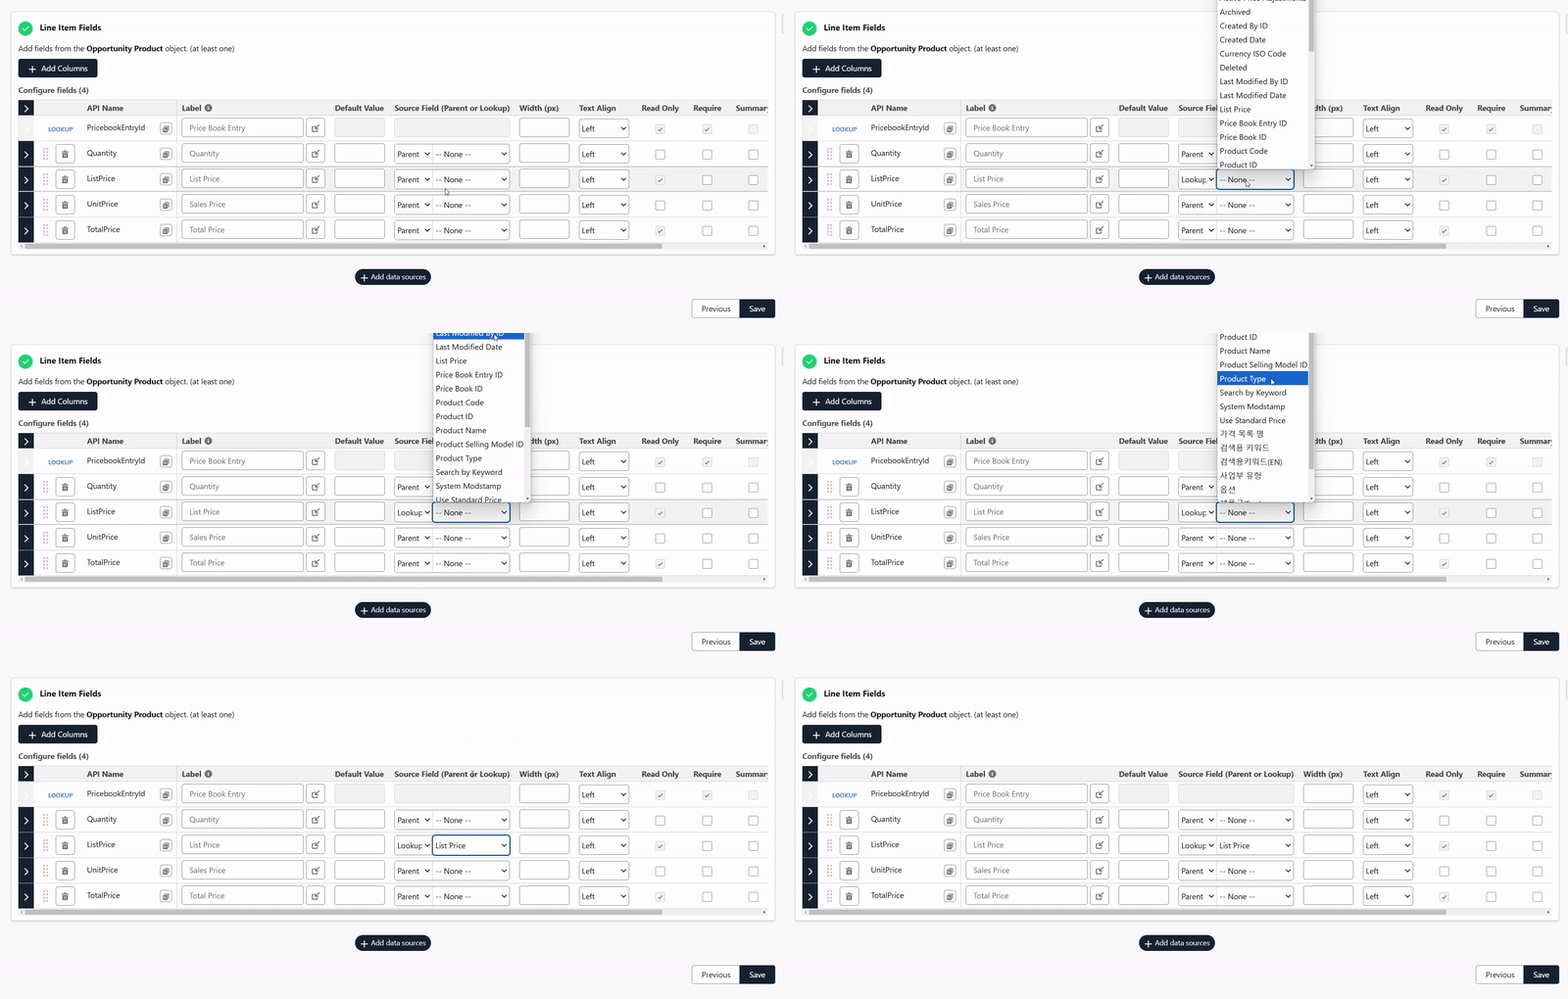
On the Line Item Editor configuration page, you can add the fields that need to be displayed when adding line items, and you can implement discount and calculation functions directly.
First, as in the previous step, click the “Add Column” button to include the necessary fields.
Select the source fields. When bringing the lookup object (e.g., Pricebook Entry) as a source field, select “Lookup” and then choose the appropriate field.
Now, let’s apply the discount rate to the selling price. Click the arrow button (>) to the left of the field where the discount rate needs to be applied (e.g., Selling Price) to expand the calculation options.
Check the “Enable Discount” checkbox to activate it, and then select the original source price field. For example, for Opportunity Products, choose the List Price.
If rounding is required, select “Round” and specify the rounding position.
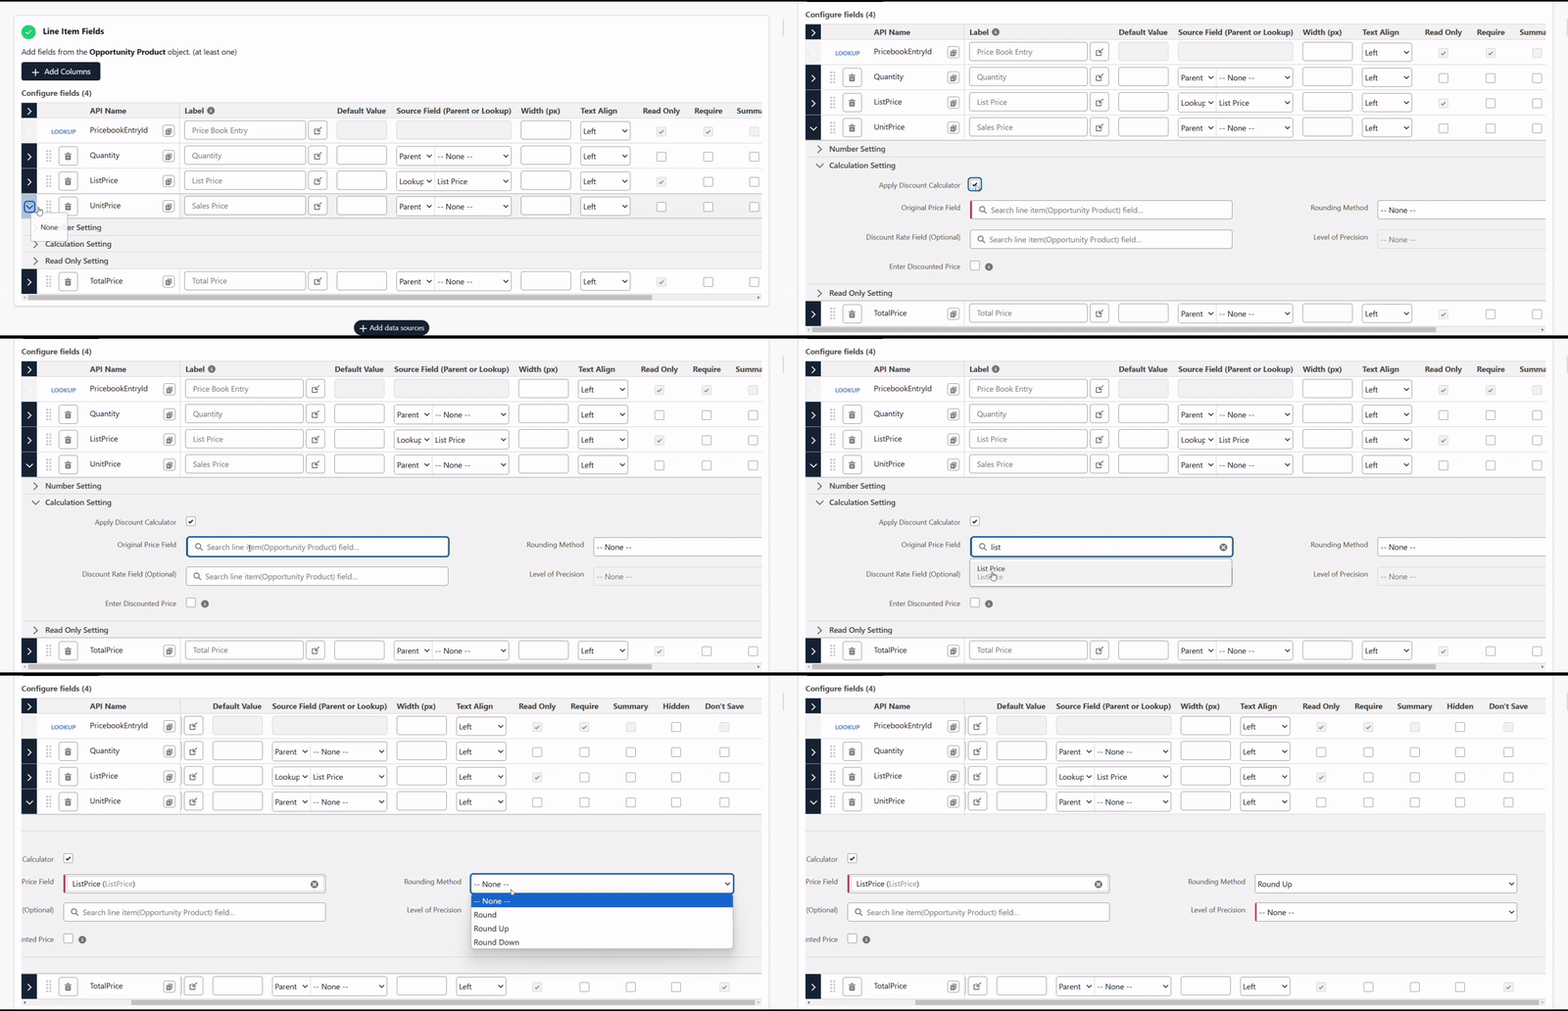
Finally, let’s look at how to apply the calculation formula to the total amount.
Similar to applying the discount rate, for the field requiring a calculation formula (e.g., Total Amount), you will input the following formula to automatically display the value calculated by multiplying the selling price (Unit Price) with the quantity (Quantity).
UnitPrice * Quantity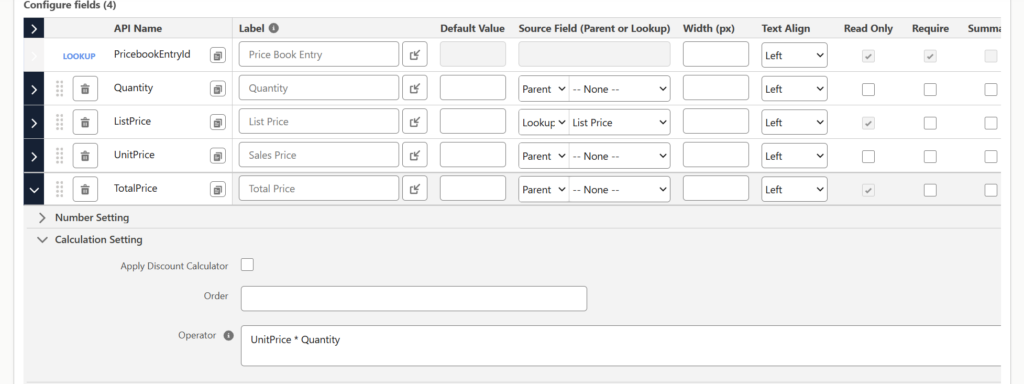
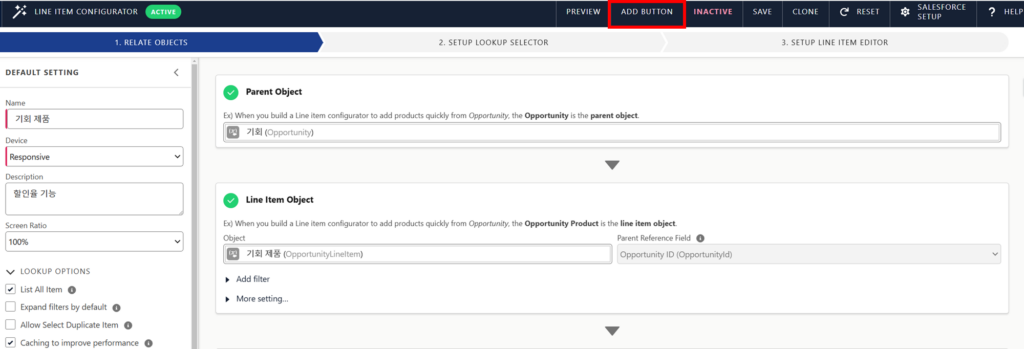
Step 5 : Add Button
After saving, click “Preview” to see how the changes will be applied in the actual Opportunity object. Then, click the “Add Button” button to include the button in the required page layout.
Conclusion
By utilizing SmallBuilder Line Items, you can easily input discount rates for each product when adding them, allowing prices to be automatically calculated and reflected in real time based on the entered discount rates. This makes it simple to manage complex pricing policies for various products and ensures accurate price calculations without mistakes or discrepancies.
In this post, we outlined the step-by-step process of implementing the dynamic pricing calculation feature. Through these features, Enterprises can save time and resources, maximizing sales performance with efficient price management.
More features and applications can be implemented through SmallBuilder’s various tools, and they can be easily expanded to suit specific needs. We hope that SmallBuilder helps you discover more possibilities and enhances your business’s competitiveness.
Thank you.


![[Use Case] Dynamic price calculation with Line Item discount](https://blog.smallbuilder.com/wp-content/uploads/2024/10/Use-Case-Line-Item별-할인율-적용으로-다이나믹-가격-계산-1.jpg)
![[Use Case] Easily Managing Detail Data in Master-Detail Relationship [Use Case] Master-Detail에서 Detail 데이터 쉽게 관리하기](https://blog.smallbuilder.com/wp-content/uploads/2025/02/Use-Case-Master-Detail에서-Detail-데이터-쉽게-관리하기-370x245.jpg)
![[Use Case] Process Mass Action and Row Action on List Directly [Use Case] 리스트에서 바로 처리하는 Mass Action과 Row Action](https://blog.smallbuilder.com/wp-content/uploads/2024/11/Use-Case-리스트에서-바로-처리하는-Mass-Action과-Row-Action-370x245.jpg)
![[Use Case] Import & Export : An Essential Tool for Managing Bulk Data [Use Case] Excel Import & Export 대량 데이터 관리의 필수 도구](https://blog.smallbuilder.com/wp-content/uploads/2024/10/Use-Case-Excel-Import-Export-대량-데이터-관리의-필수-도구-370x245.jpg)
