Hello, this is the SmallBuilder team.
The feature to select options for each product when adding products to an Opportunity or Quote plays a crucial role in meeting customized customer requirements.
By offering a range of product options, it’s possible to configure products and provide quotes matched to the customer’s desired specifications.
In this post, we will introduce how to implement a feature that allows option selection for each product using SmallBuilder Line Items.
Business Use Case
For example, Company A sells Desktop PCs, and each product comes with various options.
Users should be able to select options like the following when adding products to an Opportunity or Quote.
- CPU
- Memory
- SSD
With this option selection feature, customers can choose a product configuration that suits their needs, and the sales team can provide quotes with prices automatically calculated based on the selected options.

Advantages of the Option Management Feature
The key benefits provided by the option management feature are as follows:
- Customized Product Configuration: Customers can select options that meet their needs to create a customized product.
- Real-Time Price Adjustment: Prices are automatically calculated based on the selected options and immediately reflected in the final quote.
- Alternative to CPQ Solutions: By leveraging the option management feature, you can implement a simple product configuration and pricing process without the need for complex CPQ solutions.
Now, let’s implement the option management feature using SmallBuilder Line Items.
Step 1 : Set Up Parent and Line Item Objects
First, set up the parent object (e.g., Opportunity or Quote) and the line item object (e.g., Opportunity Product or Quote Product).
Select the field to be referenced from the parent object (e.g., Opportunity ID) to define the relationship between the objects.

Step 2 : Set Up Lookup Object
Select the lookup object (e.g., PricebookEntry ID) to retrieve product options and pricing information.
In this step, set up filters to allow search of prices and options for specific products.
For example, filter the data to match the price book (Pricebook) and currency (CurrencyIsoCode) from the parent object, so that only products belonging to that price book are searched.
Pricebook2Id = '{$Parent.Pricebook2Id}' AND CurrencyIsoCode = '{$Parent.CurrencyIsoCode}'At this time, make sure to select the Use Product Options toggle to activate it.

Step 3 : Configure Search Selector
Select the fields that need to be displayed when searching for products and arrange them in the desired order.
- Name
- ProductCode
- UnitPrice
- CurrencyIsoCode

Step 4 : Set up Line Item Editor
Similarly, select the fields to be displayed in the line items. When sourcing from the look up object, set the source fields to retrieve the appropriate fields.
- ListPrice
- UnitPrice
- Quantity
- TotalPrice

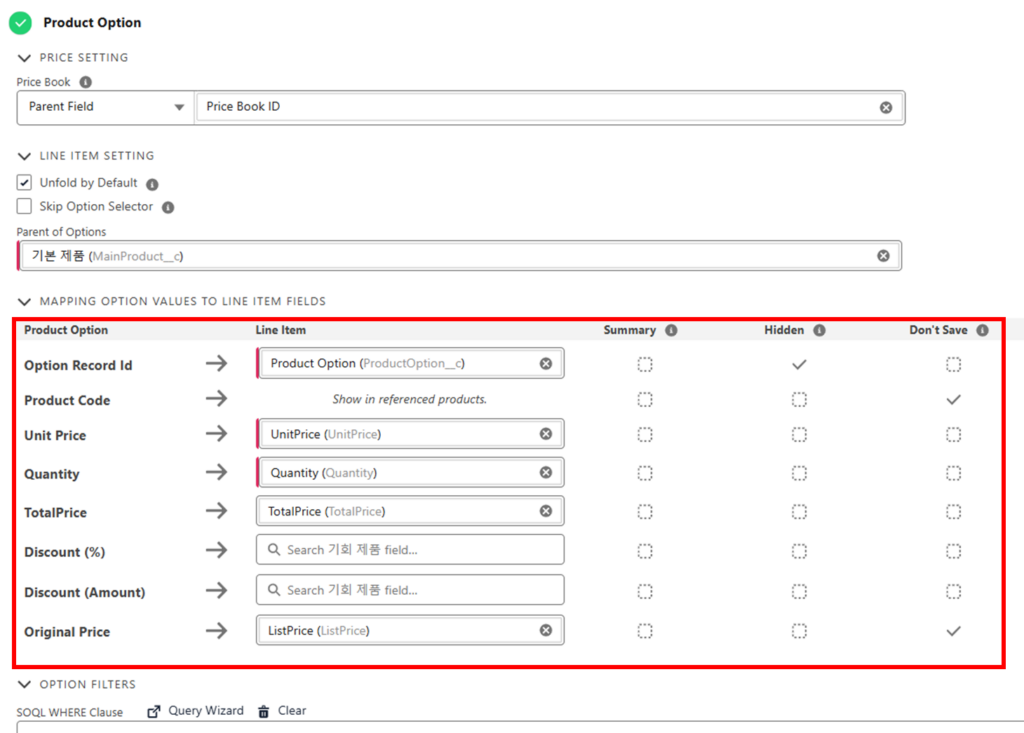
Step 5: Set up Product Options
Finally, review the mapping of product option values to the line item fields.
When setting options, the default settings will appear as shown in the screenshot below, so if there are custom fields, search for them and map accordingly.

Conclusion
Setting up product options using SmallBuilder Line Items is incredibly easy and straightforward.
Without complex configurations, you can quickly add various options as needed and reflect them in real-time pricing.
With just a simple setup, it supports customized product configurations, allowing for easy pricing and option management without the need for complicated CPQ solutions.
The sales team can experience customized solutions through these features and easily manage flexible pricing policies.
In this way, SmallBuilder is a no-code tool designed for the rapid and accurate implementation of features that meet the various needs of businesses.
Thank you.


![[Use Case] Option Management: Customized Option Selection Feature by Product](https://blog.smallbuilder.com/wp-content/uploads/2024/10/Use-Case-옵션-관리-제품별-맞춤형-옵션-선택-기능.jpg)
![[Feature] Multi-Column Sort in List View: See More, Sort Smarter](https://blog.smallbuilder.com/wp-content/uploads/2025/07/목록-보기-다중-열-정렬-더-많은-열로-보고-싶다면-370x245.jpg)
![[Feature] ✍️Signature Component – No More Paperwork: Sign Right On-Site ! Mobile Signature Featured Image](https://blog.smallbuilder.com/wp-content/uploads/2025/06/documetns-모바일-서명-기능-370x245.jpg)
![[Feature] 🔎Powerful Filtering: Utilizing Dependency Filters](https://blog.smallbuilder.com/wp-content/uploads/2025/02/MainImage-370x245.jpg)
![[Use Case] Easily Managing Detail Data in Master-Detail Relationship [Use Case] Master-Detail에서 Detail 데이터 쉽게 관리하기](https://blog.smallbuilder.com/wp-content/uploads/2025/02/Use-Case-Master-Detail에서-Detail-데이터-쉽게-관리하기-370x245.jpg)